Refresh Your Patio With Click-Together Tiles and Neatly Finished Edges
Learning how to install composite deck tiles starts with a suitable base. Prepare a clean, flat, solid surface, plan the layout and leave the specified clearance around fixed structures. Then connect the tiles by hand and fit compatible ramps where required to finish exposed edges.
NeoTimber® composite deck tiles offer a modular alternative to a joist-supported board installation. They can refresh a suitable existing surface without constructing a new decking frame. However, they cannot correct unstable paving, poor drainage or structural defects underneath.
This composite deck tile installation guide covers the main preparation, fitting and care steps. Read it alongside the NeoTimber® Deluxe Deck Tiles installation guide before starting.
In this guide: Check the base · Plan your layout · Connect the tiles · Fit edge ramps · Final checks · Ongoing care · FAQs
1. Check and Prepare the Installation Surface
Start with a surface that supports each tile evenly without rocking. Concrete or sound paving can provide a suitable starting point, subject to condition and drainage. Sweep away dirt, stones and debris, and resolve loose or uneven areas before laying tiles.
- Stability: the base must remain secure under the tiles and expected use.
- Flatness: check for local bumps or depressions that prevent the tile base sitting properly.
- Drainage: water must have an unobstructed route away beneath the tiled surface.
- Access: preserve access to drains, inspection points and any services.
A flat surface does not mean removing a designed drainage fall. Retain effective drainage and ask for advice if you are uncertain whether the base is suitable. Avoid laying tiles directly onto grass, soil or loose gravel. For a proposed compacted aggregate base, confirm the specification with NeoTimber® before proceeding.
Existing decks, balconies and roof terraces
Covering an old timber deck will not repair decay or loose boards. Have its condition assessed first. For balconies and roof terraces, check loading, fire requirements, waterproofing compatibility, drainage and the effect of the added floor height on thresholds and guarding. A hard surface alone does not establish suitability.
2. Measure the Area and Plan the Tile Layout
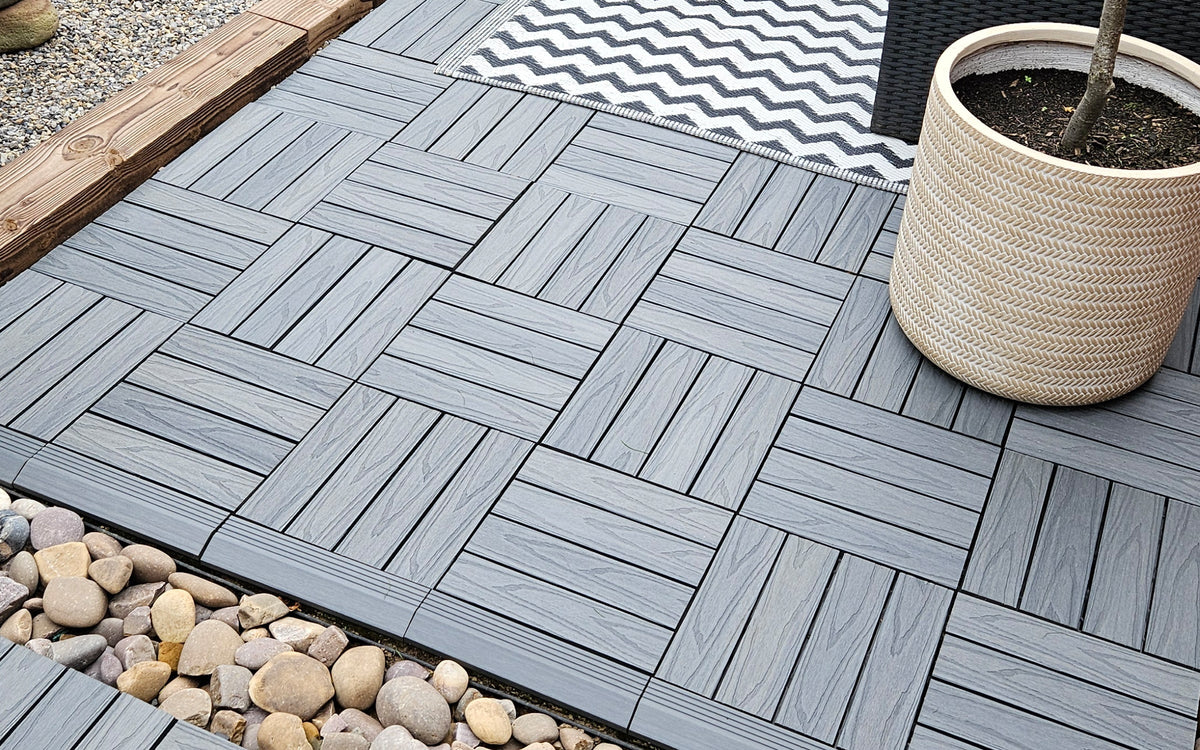
NeoTimber® Deluxe Composite Deck Tiles measure 300mm × 300mm × 25mm. Use these dimensions to plan rows and columns, allowing separately for perimeter clearance and any ramps. Check the current pack information when ordering.
Dry-lay a small section to compare a straight or alternating pattern and to understand how the connectors align. Decide where exposed edges will finish before connecting the entire area. Include ramp dimensions in the plan rather than treating them as an afterthought.
Check door swing and thresholds with a tile in position. If the layout requires cutting, obtain product-specific advice first: cutting can affect the connector base and the ability to fit adjoining tiles or ramps. Do not assume every trimmed edge will remain usable.
What will you need?
- Enough tiles for the measured layout, with an allowance appropriate to its complexity.
- Compatible straight and corner ramps for the planned exposed edges.
- A tape measure and a broom or soft brush for preparation.
- The current product installation instructions.
Connecting full tiles on an already prepared base does not require screws, separate fixing clips or joists. Base repairs or a non-standard layout can require additional work and equipment.
3. Position and Connect the Composite Deck Tiles
Position the first tile
Begin at a planned corner. Identify the projecting male connectors and the receiving female connectors on the tile base. NeoTimber’s guide specifies a 10mm gap between tiles and walls or other fixed structures to accommodate movement. Maintain this clearance around the layout.
Connect the next tile
Align the receiving connectors of the next tile with the projecting connectors of the installed tile, then press them together gently. Check that the connection is engaged and both tiles sit properly on the base.
If a joint will not connect, stop and check orientation, alignment and debris. Do not hammer the tiles together or force a connection over an uneven surface.

Continue across the prepared area
Work in manageable sections, checking alignment and stability as you go. It is easier to correct a misplaced tile early than after completing the whole layout. Recheck the perimeter clearance as the installation expands towards the opposite boundary.
The click-together system simplifies assembly, but the time required depends on preparation, shape and detailing. Allow time for the checks rather than working towards a fixed installation-time promise.
4. Install Straight Edge and Corner Ramps
Compatible ramps provide a sloping finish at exposed tile edges. They can reduce the abrupt change in level, but the completed transition still needs to suit the route and its users.
Straight edge ramps
Position the straight edge ramps to match the tile connectors. Engage the ramp with the tile and connect adjoining ramp sections as shown in the product guide. Check that each piece sits securely without rocking.

Corner ramps
Use compatible corner edge ramps at the planned external corners. Connect them to the tile and adjacent ramp pieces, checking alignment before completing the perimeter. Ask NeoTimber® about connector compatibility where a proposed edge arrangement differs from the illustrated detail.

5. Check the Finished Installation
- Confirm that connections are engaged and no tiles or ramps rock.
- Recheck clearance beside walls, posts and other fixed structures.
- Make sure doors open freely and thresholds remain usable.
- Keep drainage outlets and inspection access clear.
- Check exposed transitions for loose components or trip points.
Resolve movement before placing furniture or opening the area for use. If a tile repeatedly works loose, investigate the connection and base rather than simply reconnecting it each time.
Care for Your Deck Tiles After Installation
Clean when needed with warm soapy water and a soft-bristled brush, following the product care instructions. Clear leaves and soil from joints and accessible drainage routes. Inspect connections periodically, especially if furniture or containers have been moved.
Low maintenance still includes cleaning and inspection. Wet weather, algae and debris can create slip risks, so keep the surface clear and attend to pooling water. Avoid assuming that care instructions for a different decking product apply to the tiles.
Explore the wider decking options if your project needs a new supporting structure. For a suitable existing base, browse composite deck tiles and ramps or contact NeoTimber® with your layout and base details.
Frequently Asked Questions
How do you install composite deck tiles?
Prepare a suitable base, measure the layout, leave the specified perimeter gap and connect the tiles by hand. Fit compatible ramps and check stability, drainage and access before use.
Can I lay composite deck tiles directly on grass?
No. Grass and soil do not provide the clean, flat, solid support required by the installation guide. Prepare an approved base first.
Do composite deck tiles need a subframe?
NeoTimber® Deluxe Deck Tiles are designed to sit on a suitable supporting surface without a separate joist frame. They are not intended to span unsupported areas.
What expansion gap should I leave?
NeoTimber’s installation guide specifies 10mm between the tiles and walls or other fixed structures. Check the current instructions supplied for your product.
Do I need tools for composite deck tile installation?
Connecting full tiles and compatible ramps is a hand-fit process. Measuring, preparing or repairing the base, and any approved cutting, may require tools.
Can I install deck tiles on a balcony?
Only after confirming the proposed system meets the balcony’s requirements, including loading, fire performance, drainage, waterproofing and finished height. Obtain project-specific approval where needed.